Thursday, September 23, 2010

New Furniture


I have finally found a chair to go with the new sofa I made. I call this set my "Manhattan Set". Now, I have never been Manhattan, but I can see this set in a penthouse apartment with lots of tall windows looking out over the city. I have the set on CDHM.org. One more piece of 1/2 scale furniture to make, I'm outa here!!

Monday, September 20, 2010

Ginger !

I've got an animal story for that has to do with miniatures. I've told you, a long time ago, that I have a pet rabbit, his name is Ginger. I was hoping he was a girl, but he turned out to be a boy, but that got taken care of. He is normally lying around on the floor close to me in my work room, he's out all day. I put him away in his cage around 9 P.M. and gets out again around 8 A.M. to munch a bunch of fresh greens.
So much for his schedule. Mary, my friend comes over and we try out new things in miniatures. One day we were cutting out cabriole legs. Making patterns and trying them out. Lunch time came and we got up to go into the kitchen to make something to eat. Of course we were talking and laughing and I was not paying attention to what I was supposed to do. I have to tuck my chair back under the table, I didn't.
Mary and I ate our lunch and were anxious to get back to work. We went into the work room and looked for the pattern, the one we liked and had taken a long time to draw out. After a few seconds I stopped. I began noticing the tell tale signs that the top of my table had had a visitor, Ginger.
I hadn't tucked my chair in, he loves to jump on my chair as soon as I get up. He jumped on the chair and onto the table and began nibbling on anything that caught his fancy. He fancied our pattern, a lot, it was all gone! He had tasted a few other things, our wood, magazines and other pieces of paper. Thank goodness he doesn't go after electrical cords, my tabletop has many.
Back to the drawing board!!

I was sick for a long time a while back, during that period that I was making my Mary Engelbreit room box. I would try to go in and work on it, but being sick I would stop and forget to put the chair back. I was so very lucky, Ginger would get on the table and he would chew on things but he never damaged the room box. I had the inside all done and he could have done a lot of damage to it. The only damage I found were a few nibbles on some turnings I had done in beech wood for the rocking chair. He evidently doesn't like beech wood because the nibbles were just for tasting. He would nibble on the magazines and paper lying around, though.

I didn't know that rabbits jumped onto things, I knew they jumped and Ginger is quite good at that, too. He does a hop, kick and twist when he's really feeling good. If Ginger wants to jump up on the furniture to see what's going on, he does. My cats didn't think he could jump either because they would jump on a chair to get away from the big rabbit coming after them. That didn't stop Ginger, he just jumped up on the chair, too. I don't know what the cats think of him, he's so much bigger than the outdoor rabbits they chase. In the house, the rabbit chases the cats!

TTYL Kris

Sunday, September 19, 2010

Are We Having Fun, Or What!?

You guys are great! I have so much fun making these projects for you and it's fun to read the comments, Thank You for enjoying them!!!! TTYL Kris

Saturday, September 18, 2010

Shabby Chic Curtains Part 3

On my curtains for the corner cabinet dollhouse I used "Scottie's Guide To Bauernmalerei Bavarian Folk Art Book 1" by Scottie Foster. I used her "flick leaves" and "dot daisy". Her instructions are excellent and if you do as she says, holding your brush according to her instructions you will be successful. I do not paint often, when I do I go back and follow her instructions and I am most happy with the results. She has another book, "Scottie's Bavarian Doll Haus with Decorated Furniture" using the Bodo Hennig doll furniture to paint on.

For this project I just used a small brush, 20/0 pointed round to do all of
the painting.

I made 6 lines for the petals of the flowers with a yellow dot for the center. Black dots finish off the design.
For the center 2 panels I made them with no points, you could substitute with with a single center pointed panel instead.

Leave the paint to dry.


Trim the scallops with a pair of small sharp scissors.


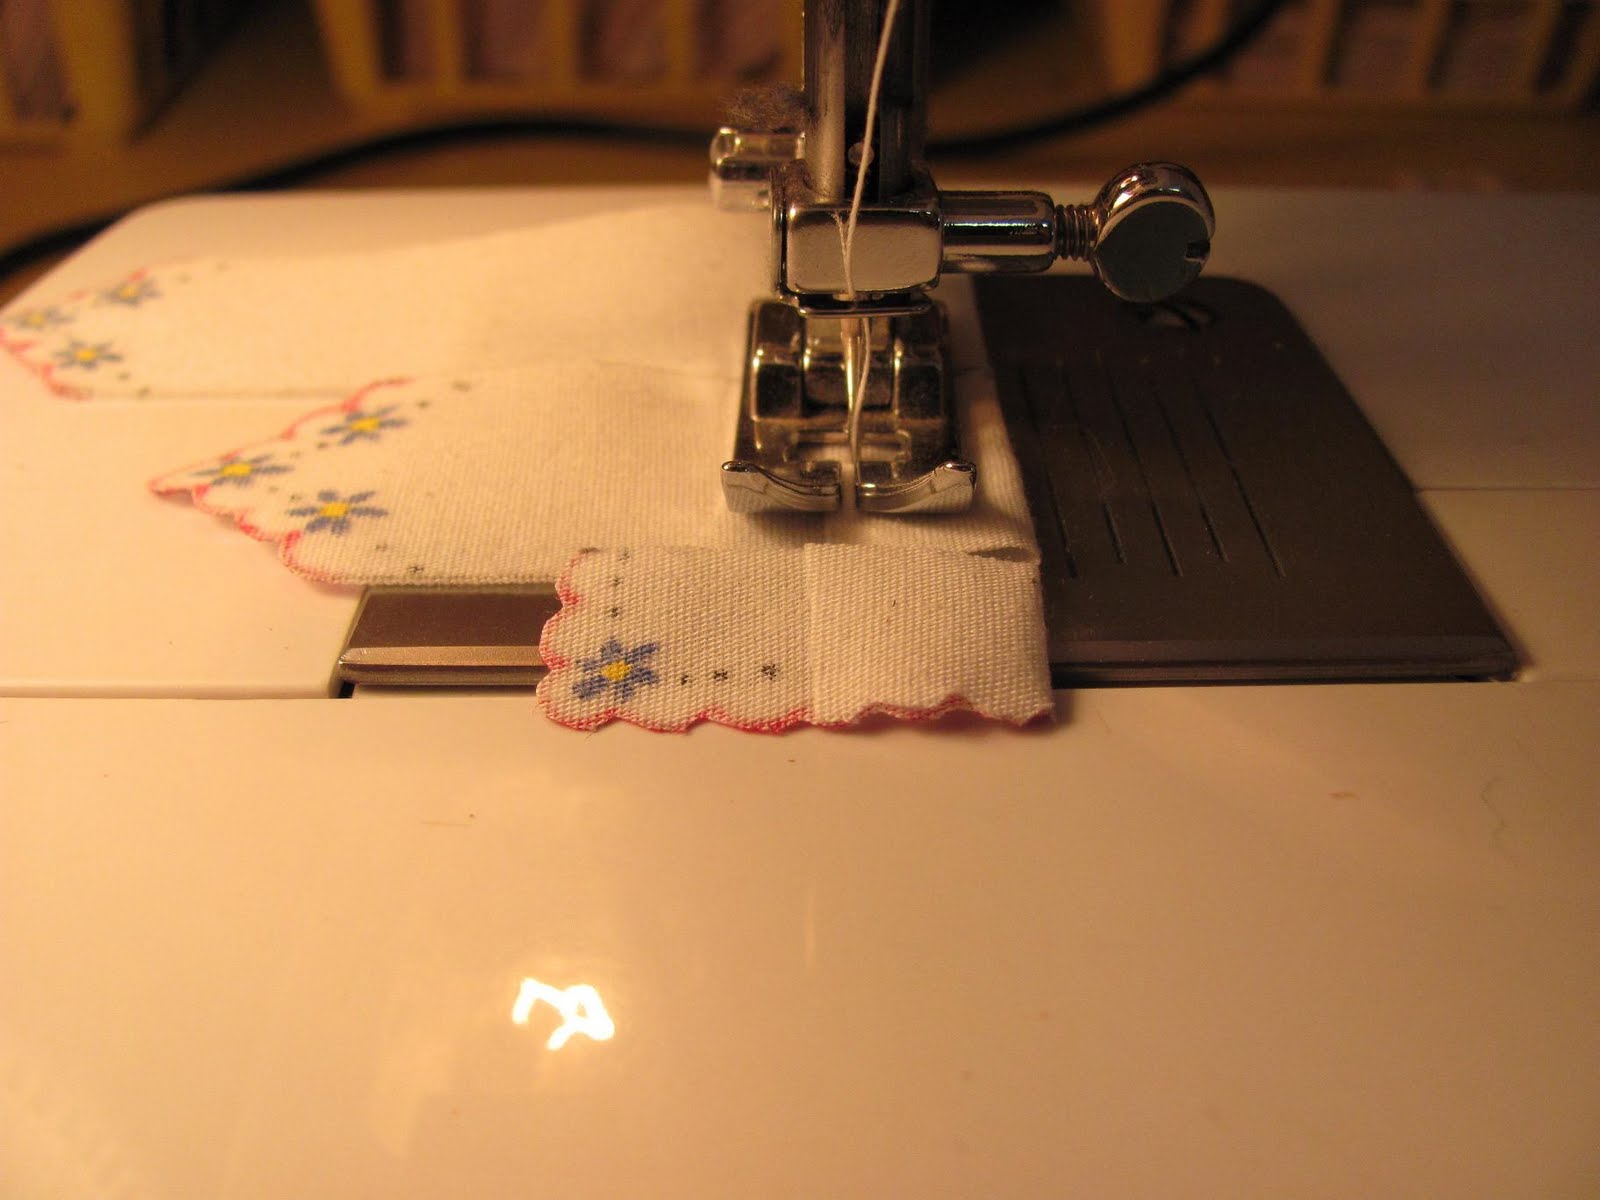
You have to sew the casing in. I "chain my panels. This is a technique quilters use. There is no stopping and starting after each panel.
First sew the bottom edge down, sew close to the raw edge. Sew the first panel, when you are near the end push the second panel in right behind the first. Continue to do this with all of the panels.
Hint: Lay the panels out in order wrong side up so you will grab the right one each time.


This is what you will have after the first seam.

Sew in the second seam the same way, it's easier now that they are all ready connected.

Remember the size of rod you have determines the casing size.


For this project I have used an 1/8 inch dowel. I used files and sandpaper to shape the ends. If you do use a straight wooden rod, a little glue on the back side at the ends helps to keep the curtains on.

Threading the panels on can be tedious and I use small tweezers to help me do it.


To shape the panels I pin the curtains to my ironing board and use tweezers to curl and hold the sides as I steam them in. Please be careful, don't burn your hands.


After I am done and the curtains are the way I want them I will spray them with a clear finish, glossy, satin or mat, it doesn't matter. This helps to keep the shape over time.

I did not use the Pretty Pleater. I did try this out for these but it used so much fabric and I didn't want that look. I just wanted an informal little curtain.

End of Part 3

And I am back to the half scale furniture!! TTYL Kris

Shabby Chic Curtains Part 2

Fold and finger press the casing down. I apply a very small amount of tacky glue to the raw edge of the casing and press to hold. This is not for permanent holding we are going to sew the casings in later. Measure for your first panel, again I measured 3 1/4 inches after the casing is folded down. Cut extra at the bottom, you will want that extra when you draw the scallops.

Make a mark in the center of the panel at your bottom for length.

Measure a half inch up from that and make marks on each side.


Connect those lines to a point, as lightly as you can.

I go ahead and cut, finger press and glue the casings and draw each point on each panel now so they are all ready for the next step.


You will probably want to cut and draw extra points to practice on.


Draw the scallops, I start with the center and make the bottom of the scallops touch the line.

They don't have to be perfect, it's shabby chic, a little wobble here and there is all right.


All of the panels have their scallops on and the casings folded down.


I painted the pattern on my curtains using acrylic craft paint with a dot of Elmer's glue added to keep the paint from soaking in and spreading. This doesn't always happen, but it has on occasion, when I least expect it, so I do this now all of the time.
You could embroider the design, use fabric markers, you could cut and glue a design on from other fabric or paper. You also could leave them plain or use print fabric. Lace could be added, you are the designer, and the sky is the limit!


I paint all of my scallops first. The paint seals the edges so I can cut them.

End of Part 2

Shabby Chic Curtains Part 1


These curtains are in my corner cabinet dollhouse, blog date: February 25, 2010.


For the fabric I used an old pillow protector that the zipper had broken on. I don't throw anything out. The fabric is very closely woven and soft.

I ironed and used spray starch on it to make it easier for measuring and drawing.
Are you wondering why there is a great big syringe in the picture?
I make a terrible mess when I fill my iron, so I had this syringe and I thought I could fill the iron with it. It works very well and no spilled water!


The curtains are separate panels of fabric. My window measured from casing (wooden trim) to casing 3 inches. I used 4, 1 inch panels and the center is 2 half inch panels. The total being 5 inches. If you have a wider window you could gain a lot of width by adding just an eighth to a quarter of an inch to each panel.


I glued small hems in the sides of the panels for the corner cabinet curtains. For this project I just sealed the side edges with glue.

I allowed a half inch extra at the top for a casing for the rod to run through. For rod I used brass tubing from Micro Mark, 1/16 of an inch in diameter. TIP: When bending tubing, run a wire into the tube, as close to the size of the inner diameter of the tube as you can get. When you bend the tube the wire will hold open the tube at the bend so the bend won't crimp closed on you. Leave the wire in the tube. I learned this when I made the kitchen table and chairs in the vintage kitchen, blog date: November 28, 2009. I have the benders but they just didn't seem to work for me.

Remember to spray some starch on the fabric and keep your pencil sharp.
I measured a few panels ahead and ran a bead of glue down the pencil lines. The right side of the curtains will be the side you didn't draw the lines on.


Again, we measure down from the top a half of inch, this is the casing for the rod. Remember, if the rod you are using is bigger you are going to have to add more to the top so the rod can go through.
The length of the curtain panels are up to you. My first panel measures 3 1/4 inches long after I have folded the casing down.


End of Part 1

Tuesday, September 14, 2010

Where Am I ?

Hi Guys, haven't been around for awhile. I have been working on some more half scale furniture and a new sofa. It's harvest time around here and I am surrounded by corn and soybeans. When they are brought in with the big combines it makes a lot of dust and it gives me one big headache. So, I've been not wanting to go into the work room to finish anything up.

Feeling pretty good today, not because of the low dust in the air but because of the mail I received yesterday. "Miniaturas" !!!!!!! I've been published!!!!!! How cool is that!!!!! This is a beautiful magazine, so large and lot's of "How to's". Beautiful pictures, and more pictures. The editor, Madelva Fernandez de Rojas is a sweet lady, she has been very nice to me and wants to publish more of the blog, how cool is that??!! I still haven't put the magazine down, I just keep looking at it, there is so much in it to see, not just me, guys. I smile from ear to ear.

O.K., O.K., enough all ready. I am going to try to get back into the work room, today. I've got to get back to work. Going to put the floral arrangement on hold and find something else for you all to do. Madelva and I have a surprise later on.

Going on a small day trip tomorrow to a tack sale to try and find a collar for Riviera the donkey. She is small so I hope we are successful. Most collars are for horses, especially the draft horses. Wish us luck. Talk to you all when I get back, Kris