

I have to thank Mary, my friend, for tearing this from a catalog. She thought it would be perfect for a blog tutorial and she was right.

Jess also has a very good tip on piping, so take a look.

I've been asked how do I go about making the slanted side containers. I will attempt to show you, but it's still trial and error on size.
I begin with a compass.

I open the compass and draw an arc.

I have removed the compass and I have taken a picture of the mark where the compass' point was. Make sure you've left that mark, you are going to put the point back into it.
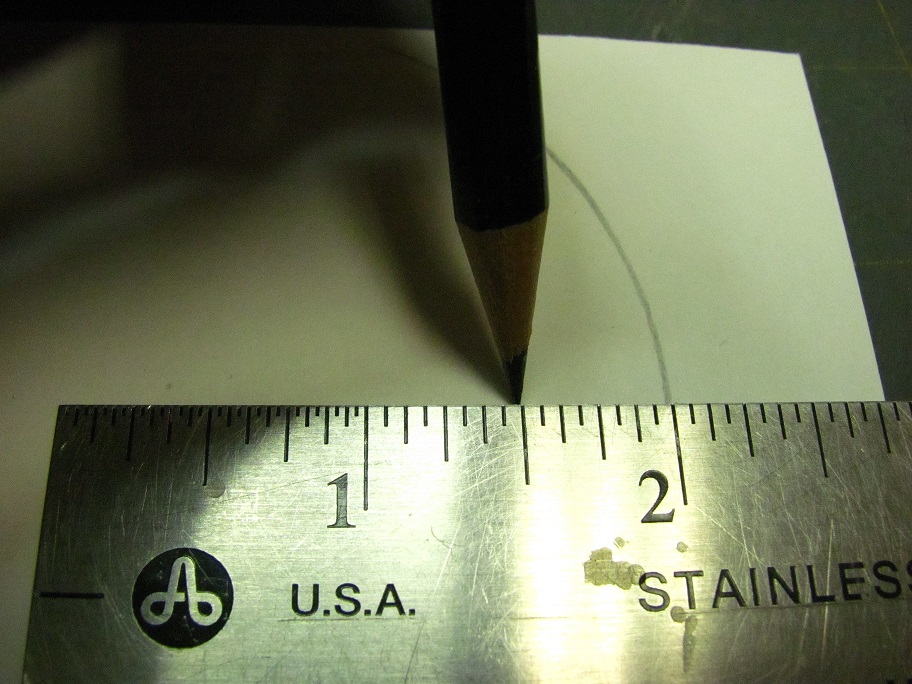
This little bucket is a 1/2 inch tall. Measure from the arc you just drew a 1/2 inch and make a mark.

Re-set your point into the original spot. Move the compass to the new pencil mark. Draw another arc.
If you just move the point of the compass back a 1/2 inch and draw another arc the arcs won't have parallel lines.

Cut out your pattern. I find the tricky part is getting the angle of the two ends right. If they aren't just right the container will be higher on one side than the other. This is where the trial and error happens.
But you don't have to do that, I have the patterns for you to copy and use.

Cut out your patterns, you will need 2 of the little "ears" for each side of the bucket.
Run the bucket over the side of the table to make it curve.

This is what you should have when you've finished.

Use yellow carpenter's glue or wood glue to glue the side together, overlap to the line.

This is the quick and easy way to make a bottom.
Apply yellow carpenter's glue to the bottom of the bucket and set it onto card stock. Let it dry. Cut off the extra card stock when the glue is dry.

This is my way, I guess I think the bucket is going to get a lot of where and tear!
The bottom of the bucket should fit into the 7/16" hole of a circle template.

On card stock trace the 7/16" circle.
Center the 5/8" circle over the 7/16" circle and trace .

Use a stylus or something similar to trace on the 7/16" line.

Cut out your bottom.

Cut small "V" notches around the circle to the inner line.

Bend the notches up.

Dry fit, always dry fit to see if any adjustments need to be made.
Use yellow carpenter's glue to glue the bottom into the bucket.

To add some surface interest glue button hole thread to the top and bottom edges. I used tacky glue for this, but the yellow glue could be used, too.
Button hole thread is thicker and stiffer that regular sewing thread.

Cut out the little "ears" and pierce holes at the dots.
You might want to pierce the hole on something that allows the pin to sink into the hole so the hole is the diameter of the pin, not just the tip of the pin as shown. The wire will fit through more easily.

Use carpenter's glue to glue the "ears" to each side of the bucket. The line should match the top of the bucket.

I am using 26 gauge green paddle wire for the handle.
It's called paddle wire because of the packaging, "they" call the thing the wire in wound on a paddle.
Dry fit the wire into the holes of the little "ears", be careful. Make the holes larger if needed.

I am showing a close up of the label. I buy this at Michael's.
I also have 24 gauge, it's a little larger and it could be used for the handle just as well.

The top of your bucket should be 3/4" in diameter.
Find something on your table that's 3/4" in diameter.
You probably have a glue stick, it's a little large but it will work.

If you have a 3/4" dowel, use it to shape the handle.

To make a holder for your bucket use some sticky wax on the end of a toothpick.

Press the waxed end into the inside of the bucket.

I've painted my bucket and handle red.
I am a copier, feel free to paint your bucket any color you want.

Have some of you bought the miniature garden hose? It has green plastic covered single strand copper wire in it that you can shape. I bought some of this wire years ago from the hardware store made my garden hose and then gave it to my son thinking I would never use it again, huh?
I sent my husband out to the shop for some single strand, plastic or vinyl covered wire and this is what he came back with.

I am choosing this one. It came from house wiring, it's called 14/2. That's the wide, flat, white wire that's in your walls. He took it apart for me. 14/2 means it's 14 gauge and there are 2 strands in it. If you are familiar with this you can use it.
If you go to a hardware store like True Value or Ace, ask for conduit wire, 14 gauge, single strand. One of the big box hardware/lumber stores would have it also.
You have to have a single strand of copper wire, not lots of little strands of copper wire. That won't hold the shape after we bend it. Some of your husbands might have this kind, it's used in automobile wiring. It's not the same thing, we've got to have the single strand.

Cut a length of wire about 3-1/2" long.

I used a little 220 grit sand paper to rough up the surface just a bit. Take the shine off.
This will help the paint and glue to adhere better.

Use the pattern from above to bend your wire to.
Lay your wire on the pattern to make sure you have it right.

This is Tigger, she's Digger's sister. Since they've come to live with us one or both of them are on the table as I work. When they were little they both fit right behind the table saw. Now, they take up most of my free space when they are together.

Do you see the washer at the top of the picture? This is a flat washer, 5/16", that's what you ask for at Ace or another hardware store. The 5/16" measurement refers to the center hole size. The outside diameter is 3/4"
Use your circle template to trace a 5/8", 7/16" and 1/4" circles onto mat board.

Cut out the circles.

Center the circles on top of each other according size, glue them together with yellow carpenter's glue.

I used tacky glue to glue the washer to card stock.
Why did I use tacky? I thought it would stick better.
This is all an experiment, so far, so good.

Trim off the extra card stock.

I filled up the center of the washer with yellow carpenter's glue. I have it a bit overfilled, you do the same.
I'm thinking I want this to dry hard, it's going to have the wire in it. If I use the tacky, the tacky will always stay flexible. If something is flexible, it can flex itself loose and then not be glued anymore.

Use a "T" pin or something similar to mark a center in the top circle.
You see I have my washer in the background. I have "open time", that's the time the glue stays wet enough to still adhere. I want the glue to set up just a bit before I put these two pieces together.

Choose a bit that's the diameter of the wire.
I have the bit on top trying to show you it's diameter compared to the wire's diameter.

Just a note: it's sometimes easier to start drilling with smaller bits and build up to the final size bit.
Drill the hole through the 3 glued pieces of mat board.
Dry fit, adjust the size of hole if needed.

Center the assembly you've just made onto the washer and press together.
There will be glue squeezed out, wipe it off.
Set this aside to dry.
Apply a second coat of paint to your bucket and handle.
I've made daisies before, they are in the tutorial listed as "Floral Arrangement".
I thought I would go over it again.
My punches are not new, so they might not be available anymore. I have found some good punches on www.franticstamper.com. Especially look under Punch Bunch.
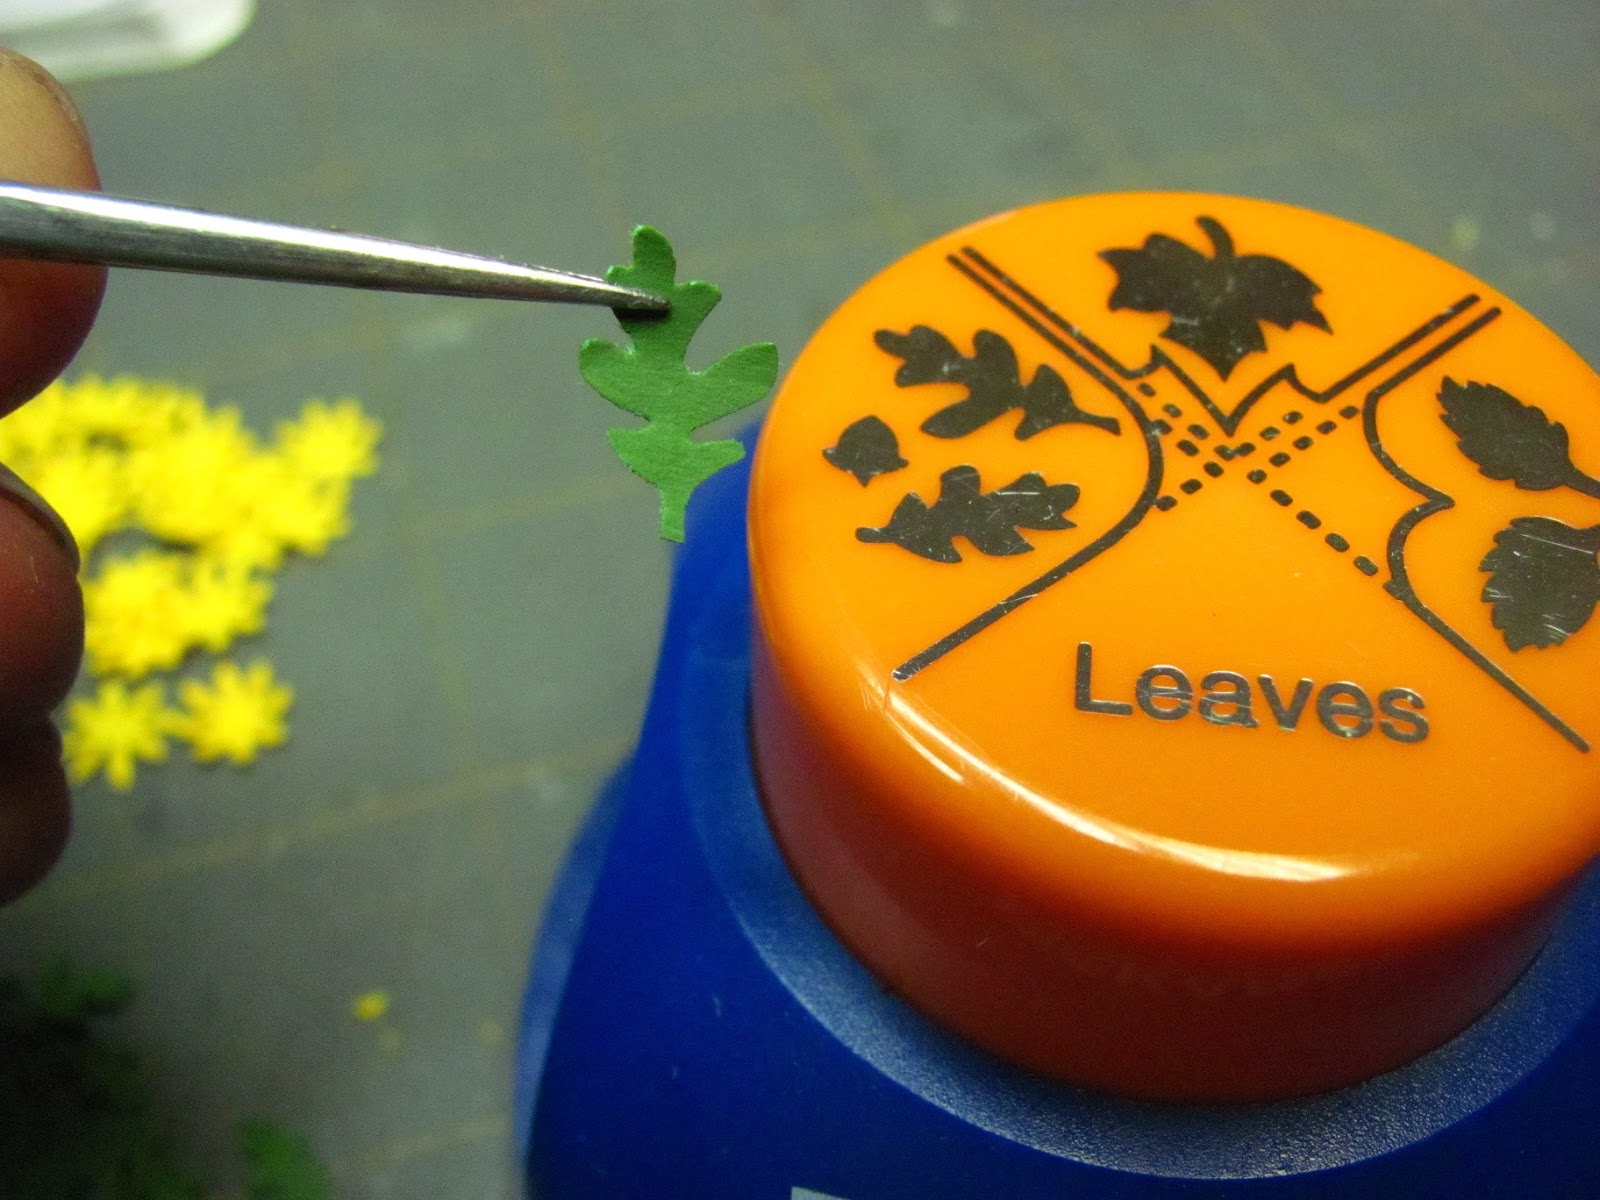
I am showing a Fiskars corner punch I use the oak leaves for daisy leaves.

This is a Fiskars border punch that has a good daisy.

I painted some green paper with Delta's Seminole Green for the leaves. I painted a Mr. Coffee coffee filter yellow for the daisies. You don't have to use the coffee filters, it just has a slight texture and I thought it would be nice. A hint on punching coffee filters, double the layers or use plain paper for a second layer when punching. This will make a cleaner punch.

I used the 26 gauge paddle wire for the stems.
I have to mention www.hankypankycrafts.com. Ruth Hanky's site is wonderful for miniature flower supplies. She has the colored paper and paper covered wire in very small gauges. Check her out sometime.

I use florist's foam, it's the kind that is soft and squishy, it's absorbs water. This is for the center of the daisies and to put into the bucket to hold the flowers.

Use needle nose pliers to bend over the tip of your wire. Bend about a 1/16". I have too much bent over here.

Dip the bent end of the wire into tacky glue and press onto the flower.
Insert the end of the wire into some foam and let this assembly dry.
I've punched a bunch of daisies. I always make more than I need. It's nice to have a few extra just in case or for that spur of the moment when you need a little flower arrangement and you have some extra flowers to make it.
I counted the flowers in my bucket and I used 14 out of the 20 I made. I used 10 leaves out of the 20 I made.

Dip the end of the wire into tacky glue and press onto the leaf.
Set this into foam to dry.

Apply a dot of tacky glue to the center of the daisy and attach another flower.
When you do this try to have the petals alternating one another.
Set aside to dry.

Cut off some of the foam, I have cut way too much. This amount would do everybody's daisies.

Tear up, chop up the foam.

Apply a little dot of tacky glue to the center of the daisy and put a small amount of the foam on the glue.
Digger is now on the table.

Digger has decided to try and eat one of my trial and error buckets. He's the destroyer, always has to try to bite everything. I've had to learn to put things away.
By the way the kittens and my rabbit, Ginger, get along very well. I guess since they were introduced when they were small Ginger took up with them.

Now, we are back to the faucet. Be careful with it, it's not entirely dry, yet. Don't knock the base and dislodge the glue joint. Yes, you could leave it overnight, but I didn't and I don't think you will, either.
Cut 1/16" wide strips of paper. You don't have to measure, they just need to be very thin.

Using the tacky because it will grab faster, glue the strips of paper to the top of the wire.
Can you see where I started, try to start there, it's about a 1/8" away from the bend.

I've wrapped the top once. Wrap it another 2 times.

After wrapping the top 3 times you have ended at the tip of the faucet.
To give the faucet a little interest wrap the end a few times with the paper. I lost count how many times I went around. You just want it to be bigger that the rest of the faucet.

I also wrapped around the back end of the faucet, it's the joint where it's connected to the pipe. You could make joints where ever you wanted on the pipe.

I added a few wraps of paper around the bottom, too.

Our friend, the "Q"-Tip.
You might ask, "Why didn't you make the pipe part from a "Q"-Tip?" I tried, it wouldn't bend as sharply as I needed it to.
Cut off the cotton end of the "Q"-Tip.

There should be a hole in the center of the paper stick.
Widen out that hole with a "T" pin.

I have a straight pin on the right side of the picture. Find a drill bit that is the same diameter or a little larger.
I am going to insert this pin into the end of the "Q"-Tip. The pin will have it's sharp point cut off and will be blunt. The hole has to be large enough for the pin to slip in easily.

Drill out the hole.

Dry fit.

Cut off about a 1/16" of the "Q"-Tip stick.

I'm guess-timating on how long I should cut my straight pin.
By the way, I re-cut the "Q"-Tip stick so it was closer to 1/16".
I ended up cutting the pin less than 1/4" long.

Use carpenter's glue to glue the stick onto the top of the faucet.

Mix just enough paint into the yellow carpenter's glue to match the paint color. This mix will be mostly glue.

I used a toothpick to dribble the paint/glue mixture onto the faucet. This blends in the stick and the wrapped paper.
Don't lose your joints, keep the paint/glue mixture thin there.

The original in the catalog said the planter has a "beaded" base. So, I added some paint/glue mixture to the base to make mine "beaded", too.

There are many, many different styles of knobs for faucets and you could use just about anything for your faucet knobs.
I bought this little punch from Michael's . It was in a dollar bin with lots and lots of other punches. I bought a couple more . . . .

I punched 4 flowers from card stock.
I glued them together using yellow carpenter's glue.

Pierce a hole in the center using a "T" pin or something similar.
Pierce on something that allows the pin to go all the way through. The straight pin we cut off is going to go through this hole.

Push the flower/knob onto the pin, don't go all the way to the top. Leave a little space for surface interest. Apply a little glue to this to help it to stay in place.
Stick the pin into the top of the faucet, make sure it goes all the way into the stick.
I mixed up a little paint/glue mixture and dotted some on the petals and on the top of the straight pin.

Look around for some odd piece of jewelry finding or use part of a snap for the faucet knob.

Glue two pieces of card stock together.

Cut the tiniest triangle from this doubled piece of card stock and glue it to the front of the faucet.
Some faucets have this knob there to hold buckets. The original doesn't have this, I think they soldered the bucket on. I didn't like that so I'm doing this.

I dribbled some of the paint/glue mixture onto the little triangle to blend it in.
I've painted the stand red, I will paint it again, let it dry and give it coat of acrylic varnish.

I've put the little "ear" of the bucket onto a piece of foam core and piercing the hole again to clean it out.

I've set my bucket under the faucet and estimated where I should cut my handle off at.
I bent the ends of the handle in.

Insert the ends of the wire into the holes of the little "ears" and bend the wires closed.
Have a trial fit.

Give your bucket a coat of acrylic varnish and let dry.

Cut some foam and glue it into the bucket.
Be careful not to mash the bucket out of shape.

Fill the bucket up.

I am using the original as a guide for my flower arranging.

Dip your stems into tacky glue before you insert them into the bucket.
I've got 5 center flowers in.

Before adding the leaves use your needle nose pliers to bend them back just a bit.

I've added some leaves around the center flowers.

I've have 14 flowers and 10 leaves in the bucket. You could add more.

You could make seasonal buckets of flowers, like mums for the fall. Of course you could use petunias or geraniums, too.
You can paint the stand a different color, it could be aged and rusty.
I hope you give this one a try, Thanks, Mary, for the idea.
As always,
Have fun, expand on it, make it better . . . .
Just Keep Making Minis!!
Kris