

I was trying to decide what to make this month for the #HBSCREATINCONTEST2015 and I remembered in the 70's everyone was finishing their basements. Your rathskeller, as some people called their finished basement, was pretty special if it had a bar. I went searching for some on the net and found this page from Sears. They had everything! Isn't this just a hoot!

I am making the top of the bar stool on the left. The bottom part of this stool is a little complicated so I opted to use the bottom of the bar stools on the bottom of the page that I show at the end of the leg assembly part. They have wooden legs and swiveled.

The first thing we need to do is to make the jig for the legs to set in while they are drying.
Use a scrap of foam core and trace a 2 1/4 inch circle onto it. Mark the quarters.

Use a "T" pin to pierce holes just on the other side of the line at the quarter marks.

With a 1/16 or 3/32 bit drill holes at those marks.
****Do you see how I am holding the drill? I am slanting it a bit. That's because the legs will be slanted when the assembly is setting in the jig.

There's the jig ready to use.

Trace a 1 1/2 inch circle on a scrap of mat board. Mark the quarters and cut out.

About a 1/16 inch in from the edge of the circle pierce holes with a "T" pin at the quarters.

Using a 1/8 inch drill bit drill the holes into the mat board.
Slant the drill a little.

This is the top that will hold the legs.

I used 1/8 inch diameter dowels for the legs. The Dremel will not hold anything larger.
Cut the legs 2 1/4 inches long.
Ignore the other mark, we will do that later.

The legs are tapered and I used the Dremel to do this.
Insert the dowel into the chuck of the Dremel, about a 1/2 inch.
Tighten the chuck, not too much to leave marks but enough that when the Dremel is turned on the end of the dowel isn't vibrating so much that it's a blur.

I have started sanding the taper on my dowel.

I hold the Dremel in one hand and the sand paper in other.
I use 180 grit to start. It takes the wood away fast. I finish up with 220 grit.
If you are afraid of taking too much too fast use a finer grit like the 220 to make the whole taper.

I am showing the finished leg and one that's not done, yet. Can you see the difference?

I am not taking too much off, the end is about 1/16 inch in diameter.

Use 220 grit sand paper to sand the rest of the dowel.
You are not trying to take any wood off just cleaning it up.

Now, let's make the mark at 1 1/2 inches for the foot rail.

Trace a 1 1/2 inch circle onto card stock and cut out.

Glue the card stock circle to the bottom of the mat board circle using the yellow carpenter's glue.

Fill the holes with yellow carpenter's glue.

Insert the legs. Wipe off excess glue.

All the legs are in. Try to keep the pencil mark to the outside.

Set the leg assembly into the jig.

Set the assembly up to eye level and make sure everything is straight.
Leave to dry.

I went back and got the whole page to show you the bottom of the wooden stools.


While the leg assembly is drying we will go on to the chair part.
Copy the patterns that Nancy has drawn for us. Re-size them to 1 inch scale. There are directions for this in the "Things to do,Things to see" list at the left, HOW TO RE-SIZE THE PATTERNS.
The seat base/seat cushion pattern is traced onto 1 layer foam core, marking quarters, 1 layer of mat board and 1 layer of card stock.

I cut the seat base/seat cushion pattern out that was traced onto card stock with scissors.
If you don't have a scroll saw cut the mat board and foam core out using your craft knife.

If you do have a scroll saw you can cut the mat board and foam core patterns out at the same time.

Apply tacky glue around the edge of the foam core pattern. Only on the outside edge, don't interfere with the pattern.

Place the foam core on top of the mat board. You don't have to trace a pattern onto the mat board. You will follow the pattern on the foam core.

Cut the pattern out and you will have two identical pieces.

Measure the thickness of the foam core seat base/seat cushion.

Cut a strip of card stock that width.

Apply glue to the edge, I used yellow carpenter's glue, tacky is fine, too.

Press the card stock strip onto the edge.
This will keep us from mashing the foam core edge when we are fitting the back on.

I use glue stick when I am gluing fabric to card stock.
We are going to make the bottom cover, now.

Apply glue stick to the card stock pattern and press onto fabric and trim leaving about a 1/4 inch around.
This is a good candidate for the painted silk we used in the last tutorial. Most of these bar stools were covered with vinyl.

Spread some tacky glue onto the foam core seat base.

Press the foam core seat base onto the card stock piece.
Cut "V" shapes out around the seat base.

Use tacky glue to glue the extra fabric onto the side of the seat base.
Set aside.

Trace the back/back cushion onto mat board.

Be sure to make marks on the mat board where the lines are.
Mark your lines before you cut out the mat board pattern.

Cut the back out and with your craft knife. Make one slice only on each line.
You only need one slice.

Gently bend the mat board at each slice, just a little bend.

Trace the back/back cushion pattern onto card stock.

Cut the card stock out.
Pull the card stock over the edge of your table to put a curve in it.

Extend the marks you made on the seat base to the sides.
This mark is the front edge of the back.

Put the back onto the seat base and hold using pins.
Remember the marks you made before, line up the front edge of the back to that line.
It helps to bend the bottom edge of the back a little to fit the curve of the seat base.

Apply yellow carpenter's glue to the back and smear it smooth.

Put the card stock cover onto the glued area pressing to get a good seal.

Remove the pins on one side and apply more glue and press.
Re-pin the back to the seat base.

Remove the pins on the other side and glue the card stock down and re-pin the back to the seat base.

This is what it should look like.

While the back is still wet you can shape it so that it fits evenly and looks nice.
If we could leave these to dry for a while, like over night, that would be great.

The seat cushion is made from the mat board piece you cut out earlier.
Cut a piece of Thermolam Plus (I buy this from Wal-Mart or Joann Fabrics, DO NOT buy the iron on),about a 1/4 inch smaller all around and glue in the center of the mat board with tacky glue.

Cut out another piece of Thermolam Plus this time have it just to the edge of the seat cushion.

The last piece of Thermolam Plus covers the side of the mat board.

Cut out a piece of fabric to fit the seat cushion and cut the "V"s out all around.

Use tacky glue to glue the fabric to the underside of the seat cushion.
Make sure that the Thermolam Plus is trimmed away. If any of it is being pulled to the underside the fabric won't glue down and give you a sharp edge.

Remove the pins from the chair assembly.

Here are the two pieces of the chair.
(and Digger's foot)

Measure the thickness of the seat base again and cut a strip of card stock that width.

Trial fit the strip for length and trim.

Use glue stick to glue the strip to fabric.
Trim the fabric the way I have in this picture.

Use tacky glue to turn up one long edge and the end with the pointed tip.
Leave the top and other end un-glued.

I am starting at the side so I can hide the seam under the side of the back.
Start with the end that wasn't glued. In the picture above that's at the lower left corner.

Use tacky glue to glue this cover on.
You will end with a nice "hemmed" edge meeting the other end.

Cut out the "V"s and glue them down with tacky glue.
Apply tacky glue to the top of the seat base and smear it out to the edge.

Press the seat cushion into place.

To make the piping cut the fabric on the bias, that is a diagonal cut across the fabric.
Apply tacky glue about a 1/4 inch from the edge.
I use size 10 crochet thread for the inside of the piping.

Smear the glue to the edge of the fabric.

Lay the crochet thread in the middle of the glue line.

Fold the fabric edge over the crochet thread.
Be sure that the crochet thread is in the very edge of the fold.
It's very difficult to move the crochet thread after you have folded the fabric.

Use your fingernails to press the fabric down next to the crochet thread.

I do this on both sides, turning back and forth at least 4 to 5 times to make sure I have a good seal.

Back and forth, pressing hard to get a good seal.

This is it.

Cut the piping off from the rest of the fabric. I slant my scissors toward the piping to get really close.

Roll the piping on the table to get it round.

Again, I am starting on the side to hide my seam.
Use tacky glue to glue the piping into the seam where the seat cushion and seat base meet.

That's done.

And Digger is all worn out and wants the lights off!

I am going to make the foot rail out of cloth covered wire. Use 20 gauge. I buy this online at craft sites.
I happen to have this because I used to make miniature wicker a lot and this is used for the legs.

I wrapped a piece around my tacky glue bottle.
My tacky glue bottle fits into the 2 inch hole of my circle template.
Make a mark on the wire where the end is.

There is my mark.

I've cut off the extra wire and I should have a 2 inch diameter circle.

To hold the wire together I am using a strip of paper and tacky glue.
Tigger's tail has nothing to do with holding the wire together!

I wrapped the paper around a couple times and made sure the wire ends were touching and pressed to seal.

After the glue was dry I sanded the paper a bit to blend it in.
Don't sand too much or your wire will not have anything to keep it together with.

Nothing is glued.
I have put the foot rail and seat cushion onto the leg assembly to see how everything looks.
Tigger is not impressed.

Use the back pattern to cut out a piece of Thermolam Plus.

Trim off a bit of the Thermolam Plus, less than an 1/8, more than a 1/16 inch.
I cut off ends of the Thermolam Plus at the bottom of the back. We do not need any Thermolam Plus in that area, that is the part that is glued to the seat base, the less bulk the better.

The next piece of Thermolam Plus is cut larger.

Glue the Thermolam Plus pieces onto the back using tacky glue.
The last piece is glued over the edge of the mat board and trimmed.

I tried to ways of laying the fabric onto the back. Straight grain and bias grain. Since we are pulling this fabric over curves the bias works better and leaves the cushion without light wrinkles.
If you can use the bias, if that doesn't mess up a patterned fabric, I would use the bias cut.
Cut enough fabric to cover your back.

This shows what I was talking about.
The chair on the left has the bias fabric back.

Hold the back and fabric in your hand and cut the "V"s around the top.

Glue the "V"s down with tacky glue.

Cut "V"s in the bottom and glue them to the back of the cushion.
This is easier to do with a bias cut of fabric.

Glue the bottom ends up and glue the corners together.

Trim the corners off.

Apply tacky glue to the seat base at the sides.
Do you see my mark? I have transferred it to the side of the seat base. That mark is where the front edge of the back should go.

Put the back into place. Press and hold for the glue to grab.

This is a step I add to ensure that the chair stays together.
I use toothpicks to dowel the sides to the back.
Cut the toothpicks in half and use a bit that is a little larger the the diameter of the toothpicks, I use a 3/32 inch bit.

Hold the chair in your hand and drill a hole through the back and into the seat base.

I put glue into the hole.
Then I insert the toothpick.
Push the toothpick until it's flush with the surface of the back.

I put two toothpicks in each side.

Trace the back cover onto card stock and cut out.

Pull the back cover over the edge of your table to put a curve in it.

Dry fit the cover, you should see a little of the back.
Be sure to check if the toothpicks are flush. You don't want them to show through the back cover.

Trim the back cover if you need to.
Apply glue stick to the card stock and press onto fabric.
Trim the fabric and cut the "V"s.

Use tacky to glue the extra fabric down.

Spread tacky glue onto the back.

Press the back cover on.

Make more piping and put it around the edge using tacky glue.

There it is.

It's not glued into place, just a look.

I used spray paint to paint my foot rail.
Because it's cloth covered wire I had to sand it smooth.
I sprayed and sanded three times, leaving the last coat un-sanded.

Last coat.

I stained the legs walnut and put a couple of coats of varnish on them.
I used tacky glue to glue the foot rail on.
If your marks were covered by the stain re-measure.
Important: Glue the foot rail on while the legs are in the jig. Let this dry.
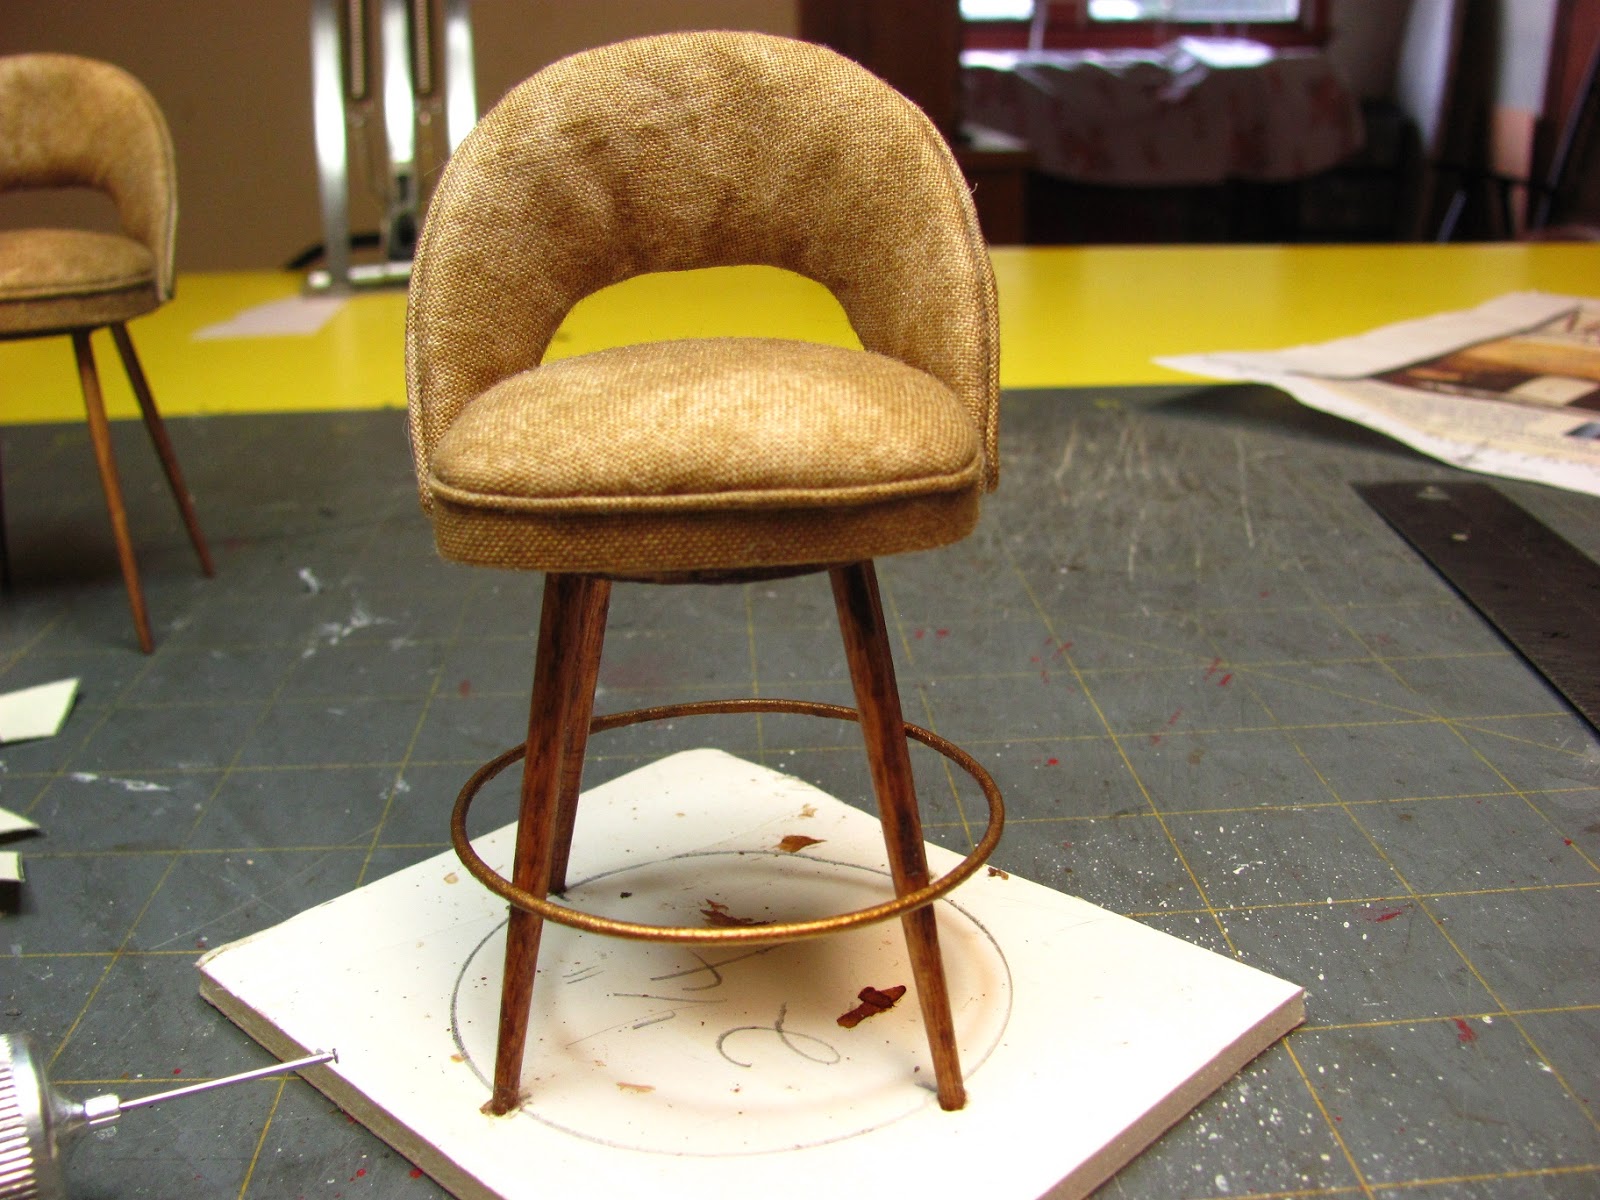
Glue your chair onto the leg assembly.
I did not make my bar stool swivel. You could by drilling holes in the center of the top of the leg assembly and the center of the seat base. Insert a small piece of 1/8 inch dowel, glue it into the top of the leg assembly. Then your seat will turn. Be careful when drilling into the seat base, you don't want to go through.
This is a good style of chair to put shorter legs on. I would also add a layer of mat board to the seat base to make it a little thicker.
It's hot, hot, hot! I can't wait for it to be over. The little chicks you saw earlier in the year are laying eggs, now. I bet that's a surprise the first time that happens!
Have fun, Expand on it, Make it better . . . . .
Just Keep Making Minis!
Talk to you later, Kris